Some people may not know but I have only been wearing glasses for the last 3-4 years. Recently I was diagnosed with an eye disease called Kerataconus. Over time, the eye weakens due to an enzyme deficiency, causing the cornea to bulge out in the weaker areas. I was first told I might have this while I was living in Indiana, but after a year my glasses prescription did not change so I let it go. Over the last year I noticed my eyesight was getting worse, especially in my left eye and decided to go update my glasses. Once again, I was told I might have Kerataconus. After visiting a specialist, it was confirmed and I looked into ways to stop the progression of the disease. There is a procedure called corneal cross-linking that is used to strengthen the cornea. Upon further research, I found out the recovery time is sometimes up to 7 months, which was immediately rejected due to my busy school schedule.
I then found a doctor who had a non-invasive treatment. Dr. Brian Boxer Wachler uses a unique eye drop formula that, when combined with a certain type of UV light, strengthens the cornea. He also has a procedure called intacs which is a very minor surgery. They insert small moon shaped discs into the bulged part of the cornea, that flattens it back to a more normal state.
When I finally got off my butt and made the appointment with the doctor, he recommended both of these treatments. I did both the very next day, and when I went in the morning after the procedure I had 20/20 vision. I've been crying tears of joy all morning. In an odd way I will miss my glasses, but I couldn't be happier. God was truly watching over me and I feel truly blessed. God bless Dr. Brian and I wish you all a Happy Thanksgiving!
PS. If you are considering Lasik, Dr. Brian has an alternative called Visian ICL. Very similar to the intacts!
Wednesday, November 21, 2012
Wednesday, September 12, 2012
Term 5
Scripting
This class was purely lecture based, just to get us familiar with the programming language of maya. We learned the basics of mel and python and I wrote a script to save me some frustrations with modeling and rendering. If you are not a maya user, ignore this next part. ;)
In maya, whenever you import an .obj, Visible in Reflections and Refractions are off. This will cause things not to render properly. This little mel script simply grabs all polygon objects and turns it on. Feel free to use it:
string $transforms[] = `ls -tr`; //lists all the transform nodes in the scene
string $polyMeshes[] = `filterExpand -sm 12 $transforms`; //filters out all the non-polymesh nodes
select -r $polyMeshes; //selects all the polymeshes
string $selected[] = `ls -sl`;
string $item;
for ($item in $selected)
{
setAttr ( $item +".visibleInReflections") true;
setAttr ( $item +".visibleInRefractions") true;
};
select -cl ;
Character Texturing
Texturing is quite an involved process. We were provided a model that had cloth, metal, leather, and skin that needed to be textured. Its not just as simple as painting directly on model. You need to paint the specularity, sub-surface scattering, bump, and diffuse.
Character Kinematics
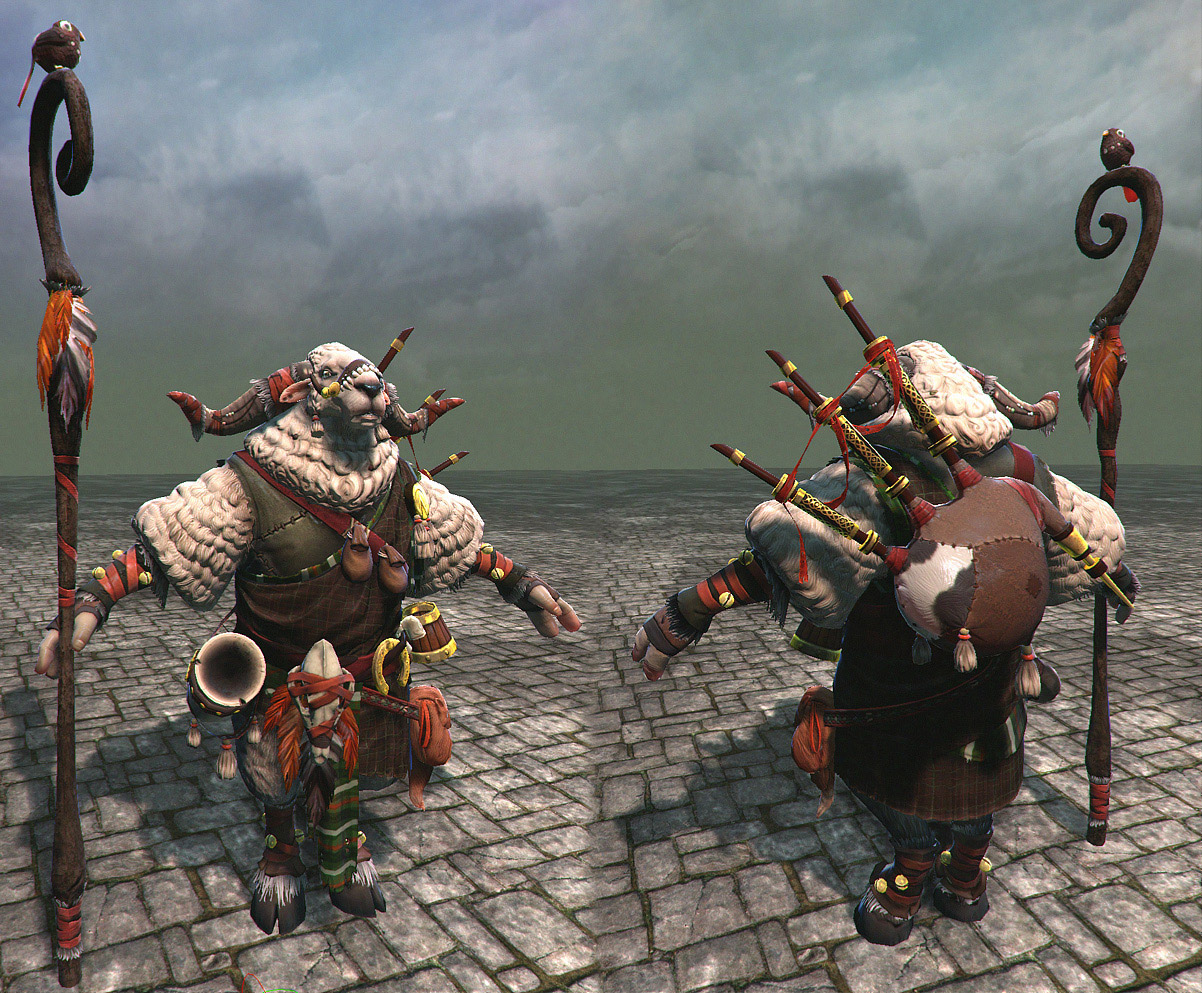
This class was all about building a proper bone structure inside a model so that when it is ready to be given to an animator, it can move, twist, and bend properly. There is a lot of little things that can go wrong with rigging so this class was very technical. I chose an awesome sheep model by Steffen 'Neox' Unger, who was kind enough to share for free. The skinning ( the way the mesh interacts with the rig) will be worked on in next term's skinning class!
Creature Sculpture
Awesome class. Week 1 was very intimidating but set the stage for the amount of hours we would need to put into our homework. My classmates could not have been more encouraging and inspiring. Once we started to see the quality that a few people put into the first couple assignments, it really pushed our creativity and attention to detail. One of the most important parts of this class was story. Our professor, Mark Dedecker, did not want to see simple lifeless models. We needed to make posed characters that told some sort of story, indicated personality, emotion, etc. This was one of my favorite classes and I want to take it all over again! Here are all my projects in order of completion.
week1:
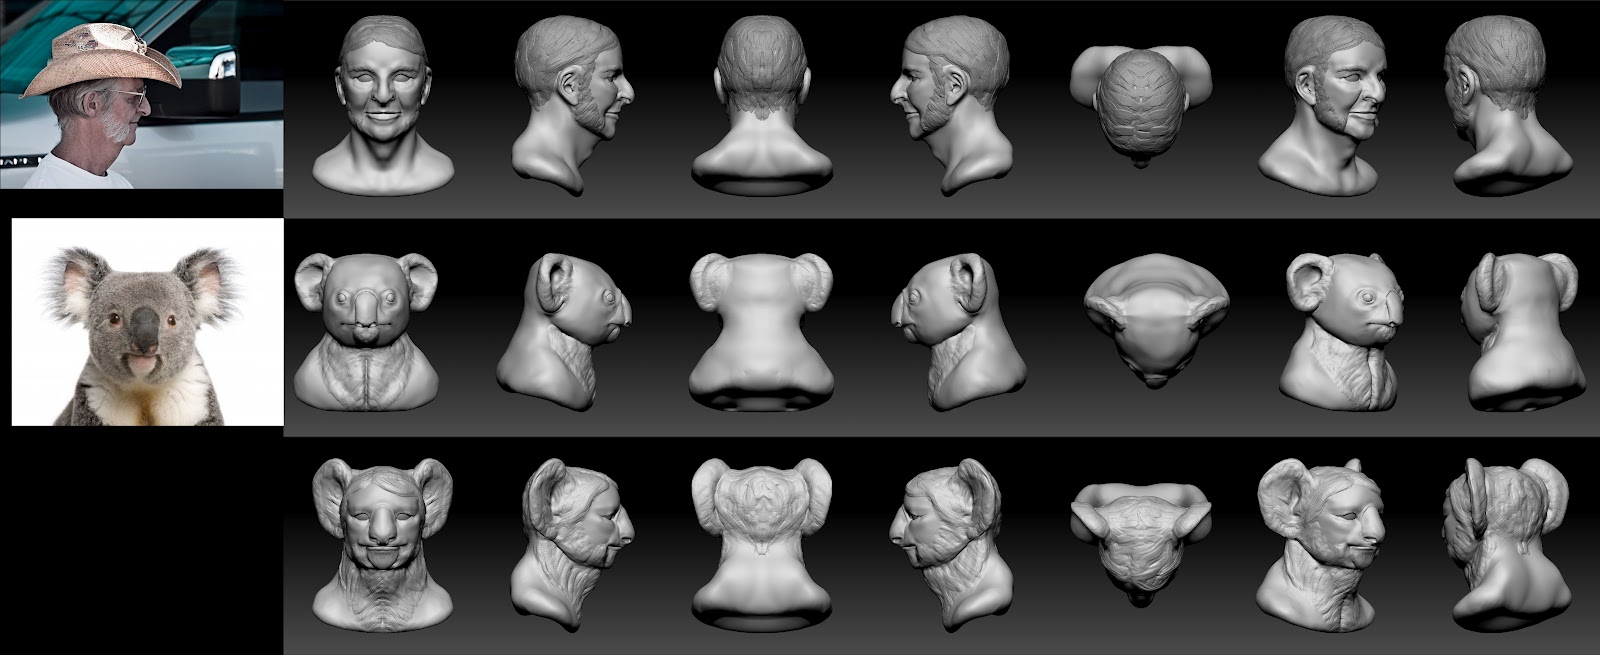
two people sculpts, two animal sculpts, the morph between each human and animal. After looking at pictures of random people, I determined that this man looked like a Doug, and that his inner animal was a koala. This assignment was definitely a struggle. Especially with the baby. The happy babies I came across looked a lot like a puffer fish to me, but I definitely dipped my feet into the creepy realm with it (a.k.a. the uncanny valley)
![]() |
| Koala Doug Morph |
![]() |
| Baby Puffer Morph (hello uncanny valley... live and learn) |
week 2: sculpt an quadroped, sculpt a lycantrope version of the animal, meaning wolf to werewolf, and making a somewhat sentient creature. I can't remember why I chose a baby pygmy, but there was just something really adorable about them. The lycantrope version is named Sherman. His story is he loves hide and seek, but isn't very good at it. Despite his small size, he fails to use it to his advantage.
![]() |
| Baby Pygmy Hippo |
![]() | |||
| Sherman: Pygmy Hippo Lycantrope |
week 3:
Turned this one in last, see the final down below
week4:
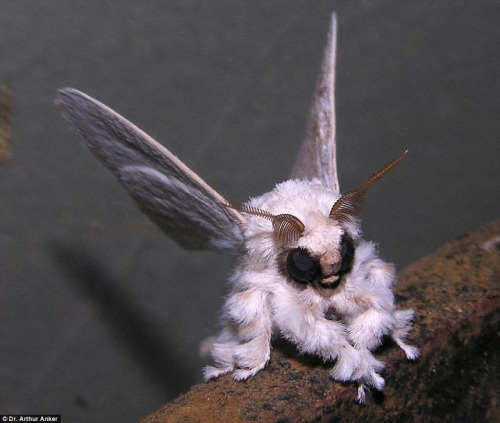
Bug week. Create your own insect based on actual insects. I chose a praying mantis and fuzzy moth as reference and created the Leg Warmer Manis. Unfortunately these went extinct in 1992.
![]() |
| Leg Warmer Mantis |
week 5:
Dragon week! We were each given descriptions of our dragons, all unique. Often times it seemed that the description was a bit of a contradiction which added an extra challenge to the execution. Here is the description I was given:
This dragon has a thin elongated body with a thin tail and neck. its fine gem-like scales are beige. on either side of its tail are sharp, blade-like extensions. this dragon has six elongated, thick limbs with five closely mounted digits on each foot that end in a long claws. it has frill like wings that stretch between its forelimbs and the end of its tail. this dragons head is wide. it has slitted eyes that are obsidian. the back of this dragons head and neck is protected by thick bone. a bony ridge separates its nostrils. two straight horns extend from its forehead.
It was difficult to keep the wings out of the way of the 6 thick limbs while he was supposed to remain long and skinny. He's a bit awkward to me, but at least he can smile about it.
![]() | |
| Hopping Glider Dragon |
Two creatures interacting, making physical contact
So the original weird idea I had as a kangaroo that wore wombats on its feet. The wombat has a pouch as well, but it is backwards. I later decided that I would just make a breed of bunnies that had reverse pouches. Flurn is a grumpy hairless dog-like creature that looks after his bunnies. This symbiotic relationship allows Flurn to keep his feet warm while the bunnies are kept safe in his pouch during the day. They also get to snack on any crumbs that might fall in his over-sized pouch. Pouch buddies for life! The physical contact was important because we had to show the compression of skin against skin.
![]() |
| Flurn and his bunny slippers |
This assignment was pretty loose. I decided to recreate a 2d cartoon character in 3d. I decided to take the character Brooklyn from the old Disney tv show Gargoyles. Not a whole lot of reference to work with, but I think I made him look as similar as I could. At some point I would like to go back and give him proper hair.
![]() |
| Brooklyn |
Our final was to revisit one of our projects this term and push it further. Since I had slacked on week 3 I decided to work on my fairy tale/ mythology creature, the Alp Luachra. It is a parasitic fairy that waits for people to fall asleep near a river, then crawls down their throat, into their stomach and eats their food, robbing them of the nutrients. I wrestled with how to make it look parasitic, and decided to go with the leech looking mouth. The additional story I came up with was this creature was once a normal fairy that turned evil, so as punishment, its wings were removed and all that remains are stumps. This creature was described as being newt-like, so at some point I will add the frills down the spine that some of the water newts have.
![]() |
| Alp Luachra |
This was our second class where we learned the compositing program Nuke. I truly can't see myself going back to after effects now. Node based compositing is the way to go! Once again, Martin Hall provided projects for us to work through in class.
Look Development
This class was about achieving a particular look with everything from metals and plastic, to cloth and hair. For my final, I decided to revisit the chess piece I modeled from Luke Mancini's concept a couple terms ago. I didn't get nearly as finished as I would have liked, but its a good start. It took me a while to settle on what colors to make everything since I wanted to stray from the concept slightly. Hopefully I'll get to do the other pieces someday.
![]() |
| original concept by Luke Mancini |
![]() | |
| Queen: rendered in vray |
Tuesday, July 24, 2012
Term 4
Survived another term, once again, passing out afterwards from exhaustion. Still, I do not regret coming to Gnomon at all. Its one of the best things that's ever happened to me. Apologies for being so late on the update!
Introduction to V-ray / Hard Surface Texturing
One of the nice things about our classes is the occasional opportunity to combine finals. Introduction to V-ray was our first class involving a different render engine. Most of my experience was with mental ray and it was nice to learn a new way to render things. For the non-3d savvy, a render engine is used to light a scene and display materials.
As for the Hard Surface Texturing class, it was all about working with materials such as metal, stone, wax, etc. The hard surface part being everything except organic things like plants and creatures. This can be anything from a stapler to a brick wall. The challenge was to not only create these materials, but also create the normal wear and tear that occurs over time or from human interaction.
I chose to revisit my sewer den scene from Term 1 and see what I could do with the same model, but all new textures and shaders (materials). It was pretty challenging learning V-ray, especially on trouble shooting grainy images and flickering artifacts.
Visual Structure
I was really looking forward to this class. The first week, we were given a list of 5 or 6 teen books and our job was to read one and come up with concept art for it over the term. I chose a book called Uglies which takes place sometime in the future, and is about a society that believes you are ugly until you reach the age 16 and receive drastic plastic surgery. This twisted book is all about superficial beauty vs inner beauty, and brain washing in the literal sense as well as through conditioning. I worked with a fellow term mate, Douglas Skot, to create visuals, storyboards, and the tone of this story as if we were going to make it into a movie.
We really wanted to make clear the disturbing nature of this view on beauty and we decided to make a teaser video. A teaser is a commercial that gets people excited about the movie, but would not be in the final movie.We were fortunate enough to find a young actress name Hana Liu to donate her face and voice to this project. I truly felt horrible for destroying Hana's face in the process of making this. The video was well recieved in class and the coolest thing that came out of this was the author of Uglies, Scott Westerfeld, said he liked it a lot and posted the video on the main page of his website.
Character Sculpting
I was also greatly looking forward to my first character modeling class. Every week we had to do a head sculpt, and it was neat watching everyone progress over time, myself included. I think my favorite weekly exercise was the skull study.
After searching online for a good concept for my final and found this one by Anna Christenson.
I was warned that because this character has so many little pieces it would be a difficult model to complete in 10 weeks. I did not get around to everything, but the majority of it is finished and I will continue to finish it in my down time. Next step is to texture it and give it proper hair, which I will save for later classes.
Animation for VFX
This class was an overview of animation, making things such as pistons and pendulums, and skinning characters to provided rigs. I used this provided model, rig, and animation to practice character skinning. This may look very dorky but the purpose of this animation is to test the flexibility of the mesh and help identify pinching or stretching problems.
Compositing with Nuke
I think that after this class, I'll never composite anything in After Effects again. Nuke is an amazing program. Its a little intimidating because its all node based, but once you get into the groove, its a faster and more organized way to go. Each class we were provided pieces of footage that we had to learn how to composite together. We learned color correction, green screen keying, tracking, and how to use 3d cameras. Here's an example of the raw files we were given.
As you can see they don't blend together at all. But through the magic of compositing, voila!
What was nice is I was also able to use Nuke on my Sewer final which was great because had I not used Nuke, it would have come out very different.
![]() |
| yikes..... |
Saturday, April 7, 2012
Term 3
Allow me to sit down and catch my breath. This last term was quite a handful. Still the usual six class schedule, projects more difficult, and expectations ever climbing. After lots of all nighters and naps in the car after classes, everything got finished and I'm happy with the results.
![]() |
| Panic nap |
Character Sculpture 2:
Once again I had a sculpting class, but this one's structure was very different from the last in that it was more of a 'follow along with the professor' course. The first half of the class we worked on a standard male head, about half the size of a real one. The proportions were all based on an Andrew Loomis drawing. Starting with a basic skull shape, we would begin to cut in the details, keeping the form very rigid, and polygonal. In the end, there wasn't must smoothing that needed to be done. The second project was a standard male torso. The style of both were very chiseled with exaggerated musculature.
![]() |
| Andrew Loomis |
Character Design:
This class was a big challenge for me. I thoroughly enjoyed it, and I don't think I've ever drawn so much in a 10 week period. Every week we had to do about 40 pages of drawings in our sketchbook, each page with multiple characters. I've never had such a hard time coming up with ideas and executing them. Our professor, Brett Bean challenged us to think about all that needs to go into a character, having reasons for the shapes chosen, creating characters that compliment and echo design. Characters that have a story.
For my final I decided to redesign the main two characters from The Iron Giant. I decided to change the boy Hogarth, to a girl (Hogatha?), and change her idol from Superman to Captain America. She wears her father's old army helmet, and carries a dart board with a star stapled to it, to act as her shield. The Giant's eyebrows can rotate down and split open, doubling as eyelids.
![]() | |
| Concept Sketches |
![]() | |
| Iron Giant Redesign |
Hard Surface 2:
This modeling class was definitely a step up from the last term. On top of creating two models, we had to learn some new 3d tools, Nex and zen tools, which in the end were very helpful on our finals. Max Dayan really motivated us to create perfect models, and very patiently broke it down for us, making us all very aware that we were constantly over complicating our topology. The midterm model had to be an existing vehicle, weapon, or some other inorganic thing, so I modeled my own Mazda 6 2008. Just the act of getting into my car became a daily reminder of all the little pieces that I had not modeled accurately. I gained a new appreciation for the people who need to model cars for a living. There's so much subtlety in the curves and its very hard to get that looking perfect.
The second project had to be from concept art so I stumbled upon an awesome looking robotic chess set, designed by Luke Mancini (Mr Jack). Concept art is awesome, and when it comes to making it 3d, there's an extra challenge in interpreting details, and what might be going on, on the back of the object. This one I had less interpreting to do on the back side because of its repeating pattern. This was a lot of fun to model, and I'd like to do the rest of the chess set in the future. Painting this model will be a project for another class.
![]() |
| Concept by Luke Mancini |
![]() | |
| Final Model |
The main focus of this class was the principles behind digital lighting using a render engine called mental ray. We spent the term going over every aspect of mental ray, shaders, lights, and compared with real world examples. The homework had us play with color, materials, spot lights, out door lights, and matching the mood of a photograph to renders.
![]() |
| Glass test |
Digital Photography:
Although I have taken photography classes before, none have been digital, and none have been as informative as this one. The class used Canon cameras, which took a while for me to get used to. I realized early on that I have a compulsion to center everything, which took a few weeks of habit breaking to get over. The assignments varied from color correction and self portrait, to lighting and green screen removal. The self portrait assignment was a blast, and if you are friends with me on Facebook, you can see that weirdness for yourself: Self Portrait Gallery.
We were fortunate enough to have a field trip to a movie shoot. It was neat see how they lit the blue screen and how the production crew worked with the camera man (professor Phil Holland).
For our final we had to remove a model from a green screen background, and place her in an environment that was entirely made up of our own photos.
![]() |
| Final Composite |
Environment Design:
This was one of the classes I was looking forward to. I've not yet had a digital painting class and this finally allowed me to learn how to do so in Photoshop. The homework for this class was 15 master studies each week. I particularly enjoyed doing studies of Shane Devries artwork (original on left).
![]() |
| Original by Shane Devries on left |
The first half of the term was black and white only. The midterm allowed us to paint any environment we wanted. Mine was oddly created while listening to a song. This being my first environment painting, I was very pleased with the result.
![]() |
| Environment Design Midterm |
Once we started using color it was surprising how difficult it was to paint accurate colors, especially during the master studies. Our eyes play tricks on us, and a color can appear entirely different based on what is next to it. For my final I chose to take my Iron Giant redesign, and put him in the environment. The theme was opposites so I chose to put a monstrous mechanical character next to a small furry creature. The environment had to tell a story. The giants design makes him look timid, his head barely coming out of the turtle neck-like collar. The creature is obviously isolated on a floating island, and bravely steps on to the giants finger as he curiously examines him. This is still a work in progress and I still need to go back in and add the giant's eyebrows and small environment adjustments.
![]() |
| Environment Design Final |
This next term will start to get more character oriented which is exciting. I hope that I can keep calm under the stress, and produce great work. A big shout out to my friends and family for being super supportive and most of all, patient with me.
Tuesday, December 13, 2011
Term 2
Well, here we are again. Another exciting and stressful term has come to and end. This term was quite a bit different from last. Most of our classes did not have homework, but rather, one big project we worked on all term. Not too much to show compared to last time, but blood, sweat, and tears definitely went into this stuff. Hope you like!
Sculpting:
By far the most anticipated and most enjoyed class all term. Even though I chose to pursue 3d back in the early years of college, I always wanted to try my hand at sculpting. due to class schedules, I was never able to take it till now, which in hindsight, I'm glad I waited. I'm still amazed that this was the first time I've ever sculpted.
Nurbs:
Probably the most difficult class for me this term was Surface Modeling 1, aka NURBS. What is a nurb? Well, its a non-uniform rational b-spline, silly. And what does that mean? ... Well I have no idea, but basically its a different way of modeling things in 3d. I usually use what's called polygon modeling, which is much like building a very blocky simplified shell, that can later be smoothed out. Nurbs is all curved based, which makes it more accurate. Its got its own set of rules though, and it was a challenge to get even a very simple model to work. My final came out looking something to the equivalent of a child's scratchy crayon drawing, but this one won't be going up on the fridge. I will however, post the concept I used. The rest is up to your imagination.
Hard Surface Modeling 1:
This class was not only great review for me, but I really did learn a lot as far as building something that's functional and structurally sound in 3d. We did have some homework in this class, but our main focus was one fairly complex model. I chose to do a robot from the video game Portal 2. His name is Atlas, and he was a pain in the Atlas to model. I truly didn't realize how many little pieces were on this guy until I really got going. I still have some more hours to put in on him as far as the modeling goes.
Texture Painting:
One of the very nice things about this class was our final required us to paint an object that had at least 10 different materials on it. Luckily for me, I modeled a little robot that was full of pieces to paint. This is still a work in progress, but it should be done by the end of this week.
Intro to Zbrush:
Zbrush is an amazing program. It allows you to start out with a very blocky character, and end up with a character so detailed you can see the pores, wrinkles and veins. The final for this class was to model and texture a sea creature. I found this concept by Mike Baccin.. My model is currently missing some teeth, eyes, and those red lips, but I'm happy with the way the color on the wings and shell came out. Thanks again, Mike Baccin!
![]() |
| Concept by: Mike Baccin |
![]() |
| Work in Progress: Zbrush model |
Anatomy:
Anatomy was a great class. My drawing skills were really rusty and it was nice to get back to a traditional medium for a change. My eyes can only stare at the computer for so long. This class had some very time consuming homework, but I came out with some nice portfolio pieces, and I got a lot of figure drawing practice as well. Its been almost 9 years since my last figure drawing class! If my schedule permits it, I'd like to continue figure drawing next term.
Subscribe to:
Posts (Atom)